Friday, January 31, 2014

Pin Picks VI

I am reviving my favorite pins from Pinterest series. I have some great ones recently that I have to show off. They are great sources of inspiration.

Here are my Top Five...

1.

I am always making lists.  It's what helps me keep all my thoughts in order. Normally, they are on scrap pieces of paper or scribbled on a Post-It note. But wouldn't it be great to have everything written on one wall like this. And such a simple project to make.

Love these whiteboards and the (Stickygram pics) | Little Green Notebook


2.
 
I want to add a little pop of color to the back of my bookshelves. For now I am leaning towards something like this. But I am still not positive, and will continue to look for inspiration.


3.
 
Did you hear that Linda from Calling It Home is doing One Room Challenge Now on Feb. 26th. Everyone who participated in the challenge back in the fall will be there to show off how their rooms currently look.  It will be fun to see what changed or stayed the same. I'll be showing my laundry room. Be sure to check it out. And if you have the time, the ORC Pinterest Board is a wealth of decorating goodness.
 
Final ORC: Week 6 Laundry Room form the Improvement List
 

 4.
 
I love everything about this bookcase. Black and white with just the right balance of pink added in. A little sparkle from the brass. There is a lot going on here, but the way everything is styled keeps it looking interesting and not cluttered. Definitely a look to emulate.
 
 
Gold & Stripes: Craiglist Wall Unit Turned Fabulous


5.
 
This is a great way to keep a list of all the meals you plan to make for several weeks. Thinking of my dinner plans on Sunday for the rest of the week (instead of the normal thing of 5 minutes after I arrive home in the evening) is one of my goals for the year. I could see something like this keeping me on track.


Check out more of my pins on my Pinterest Boards here.  And feel free to follow all my boards if you want to. I always find the best fellow pinners to follow that way.
 
 
 I'm linking up to some fun blog girls here and here.

Tuesday, January 28, 2014

Find Inspiration: Adding a Pop of Color to the Back of Bookshelves


I love the white bookcase I have in my living room. But lately I've been think that it would be nice to add a little pop of color to the back of the shelves.


I could always just paint it. That would be quick, easy and cheap. And it would be a great way to add an accent color to the room.


Bookcase
 
Via
 
50 shades of Grey implemented on Home office furniture Ideas :)
Use the extra blue paint for the back of bookshelves.
 
A wall of bookshelves accented with yellow paint on the interior back walls. Sitting in front is a stellar cream sofa with a green pattern.


But I would like to add something a little more than just color. Maybe, a pattern with wallpaper would be just the right addition to the room.
Bookshelves with wallpapered back - Pasadena 1 Home by Vanessa De Vargas of Turquoise Interior Design 
 
 Wow with Wallpaper
  Via


A great way to introduce a little texture is by using bead board. The kind made out of wallpaper could easily be cut to fit into the back of the shelves.

 
 Built In Shelving
beadboard backed shelves
This may be the perfect solution to that black screen and the empty nook in my living room.  AStoriedStyle.com


Or I could use more unusual materials like tin or wood planks from an old fence.
Paint a bookshelf, take the back off, and place metal tiles on the back. Could do version of this to china cabinet


And what a great idea to make each shelf different. That would definitely add interest to the room.
I really love this. It would make me happy to walk into this room everyday. How could you stay in a bad mood when you're surrounded by this kind of colour?
 
Put Cubby Holes to Use


So many possibilities... I will let you know once I finally pick which way to go. What is your favorite?


Link Up with Remodelaholic


Friday, January 24, 2014

Share My Un-word

Today I am linking up with The Nester to share my un-word for the year. What is an un-word you ask?

The UN-word is a word that you are rejecting for the new year. You would like to Un-Do it. 

My un-word is....


o·ver·whelm
ˌōvərˈ(h)welm/
verb
past tense: overwhelmed; past participle: overwhelmed

  • bury or drown beneath a huge mass
  • defeat completely
  • give too much of a thing to (someone); inundate.
  • have a strong emotional effect on.
  • be too strong for; overpower.
 
Or I guess it would have to be un-overwhelm, right?


overwhelmed
 
I tend to look at a project in my house that I know is going to take many hours to complete, (like the growing disorganization of stuff in our mudroom), and feel so overwhelmed by it all. Then in true Scarlett O'Hara fashion I say to myself, "I will think about it tomorrow."

Then the pile grows, and I feel more overwhelmed and the stress increases.


overwhelmed.gif


This year though, I am going to accept that I cannot fix it all at once. That it is okay to start small by breaking up the project into small chunks and slowly working through it.


A few days ago, I cleared out one corner of our mudroom and returned all the shoes, bags, toys and other things to where they were suppose to go in the house. There is still a lot more organizing to do, but it is a start. Now when I look at the room I focus on the possibilities for the space, and feel un-overwhelmed.


 It's a good beginning for the year.


What would your un-word be?


Tuesday, January 21, 2014

Learn How to Paint

This weekend I worked on one of the bedrooms in our house. Check out my inspiration here.

This was the plan...


I added just a few new things: duvet cover, curtains, chair, and desk. And shopped my house for the lamp and pillow. Some artwork is still needed, but just a little sprucing up made a big improvement to the room.


It wasn't exactly what I would call a stress free project. But in the end I learned a lot about painting; how to paint wood paneling and how not to paint a metal desk.

Lesson 1:

When the guy at the paint store seems unable to tell you how much paint you need, for the wood paneling on the walls in the bedroom, because his computer program is down, you should not proceed to ask other questions and expect knowledge answers. Hence when said paint store guy insist that the primer plus paint will work great on wood paneling....to not believe him or you will end up with this.


Lesson 2:

When you return to the paint store, do talk to the guy with the 25 years of service badge on his shirt. He will show you the right primer to get, and give very spot-on tips on how to apply it.


Lesson 3:

Even though 25 year guy gave great advice, it will probably not work for you, because you have bad luck. So you have to use two coats of the primer before the paint will stick to the wall, causing great anxiety that you will run out of said primer and have to return to paint store a third time. (For the record, I just made it...if you don't count that spot behind the head board of the bed that no one will ever see because that is now the permanent spot for said bed.

Lesson 4:

After finally finishing the walls in the bedroom, you move on to the desk. The paint job goes great with no problems. Then when the next day you move the desk into the house, from where you painted it in the garage, and barely brush it against the door frame, huge chunks of paint will fall off. You will curse yourself for not using primer, and run outside to spray paint it again. But by this time it is night, the temperature has dropped, and oh yeah it is snowing. The spray paint immediately freezes into a crackle finish on the part you were touching up. Not the look you were going for.

Lesson 5:

So back to paint store (aggghhh) where you purchase primer, sandpaper, and another can of spray paint. You think you are getting smarter now. You are wrong.

Lesson 6:

After a good sanding, the desk is once again ready to be painted. Do not rationalize that the weather is warmer (almost 40) and that is close enough to the temperature that the spray can said is acceptable (50 degrees to 90 degrees). When you add the primer, you get a small crackling effect, but you ignore it thinking the paint will cover it up. Then you add the paint, and it starts to freeze into 3D bubbles all over the whole desk. It looks awful.

Note: I was so upset I forgot to take a picture, but it looked something like this...
 

Lesson 7:

Do not cry...much...over a bad paint job.

Lesson 8:

It does not look as horrible once the paint spreads out a little as it dries. Rationalize that is looks like ice crystalizing. It might even be pretty...maybe. Also, notice that with the addition of the primer, the desk does not chip. Win!

Lesson 9:

Put the desk in the room, and admire how it looks good in the room....if you stand in the doorway....about 5 feet away. Tell yourself that it is good enough for now, and you will just sand it down and start over in April...when it is warmer outside.


Lesson 10:

Learn from this experience. Always sand, prime, then paint...in appropriate weather.

Have you failed at any project lately? Did you learn anything from it?


Friday, January 17, 2014

Spruce Up a Bedroom

I wanted to do a little refresh to one of our bedrooms. I never really loved the duvet cover in the room, so that was first on my list to be replaced. With a quick paint job and some furniture replacement I think the room would look a lot better.

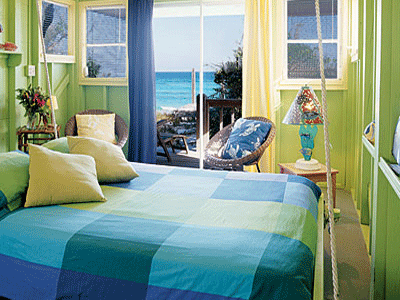
Warm weather with a beachy vibe will be the theme I am going with. The weather outside is dreadful, so this room will be a little bit of summer with an aqua and green color scheme. First I gathered up some inspiration.

Via
 
Via


Via
 
 
I would also like to incorporate some beach photography like pictures by Gray Malin.
 
This is the current plan...


So if you need me this weekend, I will be painting a wall and pretending I am on a bright, colorful tropical beach. I will show you the results on Monday.

Update: Click here to see the room in progress.


Thursday, January 16, 2014

Read a Good Book: January Twitterature Link Up


twitterature monthly reading linkup short reviews
 
 
It's Twitterature time with Anne at Modern Mrs. Darcy.
 
 
I feel like I was in a slump for a while. I just didn't love any books I was reading. Some were okay, some were even good, but there wasn't any of that can't-put-it-down feeling going on. But I think I my have turned a corner, because the last couple books I read were great.
 
 
Wonder by R. J. Palacio
 
Wonder
 

My elementary age son picked out this book just because he found the cover interesting. After he read it, he handed to me and said I should read it. He had never done that before, so of course I did as he suggested. It was a very uplifting and sweet story, and I thought very appropriate for my son to have read. It lead to some good discussions between us about how people can treat one another.


Shine, Shine, Shine by Lydia Netzer
 
 
This book is all about acceptance. It was a nice reminder for me that it is okay to be a little different in life and follow your own path. There will be people around who will take the journey with you.


The Dead in Their Vaulted Arches by Alan Bradley
 
 
I have read all of the books in this series about an eleven year old girl who is part chemist and part detective. The last few were losing their luster, and were no where near as good as the first book. This installment luckily gets back to the excellent story lines and character development that I enjoyed at the beginning of the series.
 
 Have you read any good books lately?


Monday, January 13, 2014

Organize the Christmas Decorations and Prepare for Next Year


I spent this weekend taking down all of the Christmas décor. Some reason it took me the span of two days to pack it all away, yet a month ago I was able to get everything up and in place within 4 hours. I think it might of been just because it was way more fun to decorate!

Every year, when I spruce up our house for  the holidays, I seem to leave more and more items in the boxes. And every year I say I am going to get rid of those things I no longer use. Then that time in early January comes around, and I want to hurry up and finish with the task, so I just throw it all back in the boxes just to be done with it. Well this year it was time to break the cycle.

The big reason for my motivation was my current storage system was not working. Ok, actually, I'll be honest, it had started to smell like old newspaper, because well it was old newspaper. After our first Christmas as a married couple, I wrapped all of the ornaments into newspaper and put them into cardboard boxes, and that same newspaper was still being used to this day.


On one hand it was a bit of a time capsule to see what was in the news on that day. Do you notice that I must of packed all of the Christmas things away while it was still December?! And look at me this year, all proud of myself that the house is back to normal by mid-January. Of course that was before the kids, when I was well rested and had oodles of time.

My first trip was to the Container Store for an ornament organizer.


I then transferred all of the things we no longer use into a pile to donate. Everything left over like the lights, stockings, garland, etc. went into plastic bins.


Last, I turned my attention to the Christmas cards we received from family and friends.


Now first let me say, I love getting these cards in the mail every year. We have moved a few times over the years, so this is one of the ways we keep in touch with those we no longer live near. It is just great to see how kids have grown or find out what people are up to.  But we have enjoyed looking at the Christmas cards for over a month now, and it was time to take them down. I knew just what to do with them. When my mother sent us her gifts, I commented on the beautiful gift tags on the presents. She told me that they were all made from Christmas cards she had received the year before.


After a few snips on our cards, I have my own tags for our future holiday gifts. I am already brain storming creative ways to use them.


When did you pack away your Christmas decorations? Do you have a way to keep everything organized?


Monday, January 6, 2014

Find a Way to Keep a White Couch Clean


When we originally purchased the furniture in our living room, we were in a different house with a different space configuration. We had it in a formal living room that we turned into a library. It was separate from the rest of the rooms and was for the most part only used by my husband and I for quiet moments to read the newspaper or do some work. The white couch seemed like a good idea for that type of room. Now we are in a house with more of an open concept and the couch is used all the time by the kids and especially our dog. Apparently the sun shines on this spot in the afternoon at just the right angle...perfect place for a doggy nap. It took just a few months until, frankly, it was filthy. We had it professionally cleaned, which helped, but I can't do that every month. The long term plan is to get slip covers for the couch, so I can "clean" the couch more often by just throwing the slip cover into the wash. But until that happens, I needed something to protect the couch.


Enter a blanket from Ikea.

MALIN BAND Throw IKEA
 
 
The colors went great with the pillows and other décor in the room. I arranged it over the couch, and put a dowel rod in-between the cushions to keep it from sliding around when someone sat down on it. If the blanket gets dirty I can simply throw it in the washing machine and the couch stays nice and clean. It's such an improvement to the space.