Showing posts with label laundry. Show all posts

Wednesday, February 26, 2014

One Room Challenge with Calling it Home: Now

So excited that Linda at Calling it Home decided to do an update to the One Room Challenge.

For those of you who are recent visitors to this blog, One Room Challenge involves putting together a room in 6 weeks. It was so much fun for me to participate in this back in the fall.

Week One was the before. This room so needed help.


I decided to put together a room inspired by the Greenbrier Resort. I always loved the interior design created by Dorothy Draper, and wanted to bring a little of that pink and green look into my house.


 The room re-do started with retiling the floors in Week Two.


For Week Three, I shared how I created my own fabric for the curtains.


The most commented on part of the laundry room was reveled in Week Four when I used green tape to create a wall treatment.


In Week Five I showed off all the items I was going to use to organize the space.


Week Six was the big reveal. I was so excited to be done!


Now for what the Laundry Room looks like as of yesterday....

Wednesday, November 6, 2013

One Room Challenge with Calling It Home: Week Six


It's the last day of the One Room Challenge.  I had the best time participating in this, and I am so glad that Linda of Calling It Home opened this challenge up to other bloggers who wanted to join in.

Here is the inspiration board from Week One...

 
First the before...


And then the after...


Let me give you a quick tour.

Here's a close up of the finished wall treatment that I talked about in Week Four. It is truly my most favorite part of the room. With just green painter's tape, I created a pattern that I love for about a third of what a roll of wallpaper with a green trellis design would have cost.
 It was so easy. If I made a mistake, I just pulled off the tape and repositioned it. (The walls were pretty uneven with it being a basement in an older home, so I had to eyeball most of it.)


I am also excited about the first thing you see as you walk into the laundry room. Before it was a wall of  cleaning supplies.


I put all of these items in a rolling storage caddy nestled now between the washer and the wall.


After that was done, I took down the shelves and put up a picture of flowers that grew in my backyard last spring. A much better view.


The laundry detergent packets and the Borax got new glass containers. And the dryer sheets are now in a pretty box.


I sorted the items I wanted to store in the laundry room into low cost plastic bins, and put decorative tape on the fronts to add a little color. Then I labeled everything to keep things in their place. I reused a black pencil tray to store all the batteries we buy in bulk.


Now I said back in Week Five that I had big plans for  a metal box I found at Home Goods. First, I spray painted it black. Then, I put a label on it that said Match Box (like the toy cars) and added two checkered flag stickers. I plan to store in the box all the socks that some how go in the laundry as a matched pair, but come out as a solo item. Of course, a few weeks later the match miraculously surfaces. So do you get it? Match Box for my socks that Need a Match. Your laughing with me, right?


And finally the ironing board. I used this tutorial to cover it was heavy outdoor fabric. I love the black and white pattern it brings into the room.


This laundry room is such an improvement from what it use to look like. I might actually enjoy doing laundry now. Wait a minute...let's not get too crazy! At least it is a space that I really do want to spend time in now.


And since I still have laundry on the brain, I put together a few tips on how I get through this chore here.

Be sure to check out the 20 designers, who revealed their rooms on Wednesday, by clicking here, and the final rooms of my fellow linking participants by clicking here. So much decorating inspiration!

Also linking up to I Heart Organizing, Thrifty Décor Chick, Remodelaholic

List My Laundry Tips


Entrepreneur Mom: Laundry Guide Procedures
Via

Tomorrow is the last day of the One Room Challenge. I am so excited to reveal my finished laundry room. Today, I was up in the wee hours of the morning putting on the finishing touches to the room.


Since I have laundry now on the brain, I thought I would list a few tips I have picked up along the way to get through the chore. (To put it mildly, it is not my favorite activity, but it must be done!)

1. Wash Often
I use to always wait until late Sunday night to do all the laundry for the week. I would end up tired and frustrated, and the laundry would for the most part only get half done as a result. Now, I make it a point to do a few smaller loads every few days. It prevents a big back log of laundry, and improves the chances I will actually fold everything right after it comes out the dryer.

2. Don't Sort Everything
Now that I washed clothes more frequently, I needed to increase the size of the load of laundry to justify the water use. Pretty much now I do one pile of delicates and one pile of everything else. No longer are towels washed on their own. I even will combine color clothes with whites as long as I know the color will not bleed.
 
3. Some Things Aren't Really Dirty
I know some people won't agree with this, but there are a few times that I won't wash something after we wear it. For example, if I only wore a dress to church for a couple of hours, it goes back on the hanger. Also, I try to get a few wears out of our jeans before they go into the washing machine.
(This excludes the many times my boys become covered in mud.)

4. Fold the Laundry Where It Can't Be Avoided
I use to have a bad habit of managing to fold the laundry, but since it was very late on a Sunday by then (See #1), I would stack everything back into the laundry basket instead of putting it into the various drawers around the house, where they belonged. It would then take me a few days to get around to putting things away, and in the mean time everything would get unfolded when we would dig through the basket to find a clothing item. Now I fold the laundry on my bed. I have to put things away or I can't get under my sheets. Since I like to sleep, I put the folded laundry away.
 
5. Focus On the Goal
This tip gets me though a lot of things in life. But when it come to laundry, I just keep thinking you have to do it, so there is no reason to fight it. Plus, one of my favorite little-things-in-life is to slip into a bed with freshly cleaned sheets. So happy!

These small changes have made a big improvement to our laundry routine. Do you have any laundry tips to share?

Linking Up with Serenity Now

Thursday, October 31, 2013

One Room Challenge with Calling it Home: Week Five


Join In
 
Once again it is time to link up with the wonderful blog Calling it Home, and show what I accomplished this week in my laundry room as part of the One Room Challenge.

 I can't believe that this is almost at the end. I had some great ideas back five weeks ago, but with the big reveal almost here, I did take sometime this week to reflect on this project. (If you want to check out the previous weeks click on the links: Week One, Week Two, Week Three, Week Four.) I did access what I was actually going to be able to get done. First I checked my list I made at the beginning of this project.

-Tile floor
-Decorate walls (wallpaper or stencil?)
-Get great fabric to make curtains.
-Organize cleaning supplies.
-Add decoration.
 
 
I accomplished a lot, but I still need to do the finishing touches to bring it all together.
 
This week I concentrated on organizing all the various cleaning supplies that are stored in the laundry room. This is one of the things I really enjoy doing! An organized room makes me soooo happy.
 
Plus, it mostly involved a lot of shopping! Fun!
 
First, I hit up TJ Maxx. I wanted unique containers to store the laundry detergent, borax, and dryer sheets. There were so many great options to choose from.
 
I picked up these for the detergents...


and this for the dryer sheets. The size was perfect, but I am going to add a little to it to jazz it up a bit.
 
 
I also found a way to store all of the cleaning supplies that we currently have sitting on an open shelf. It is the first thing you see when you walk in the room, so it needed help.
 
 At first, I looked at various baskets to put everything in, but I just wasn't feeling it. Finally, I realized why. I didn't want to pretty it up...I plan old didn't want to see these things at all.
 
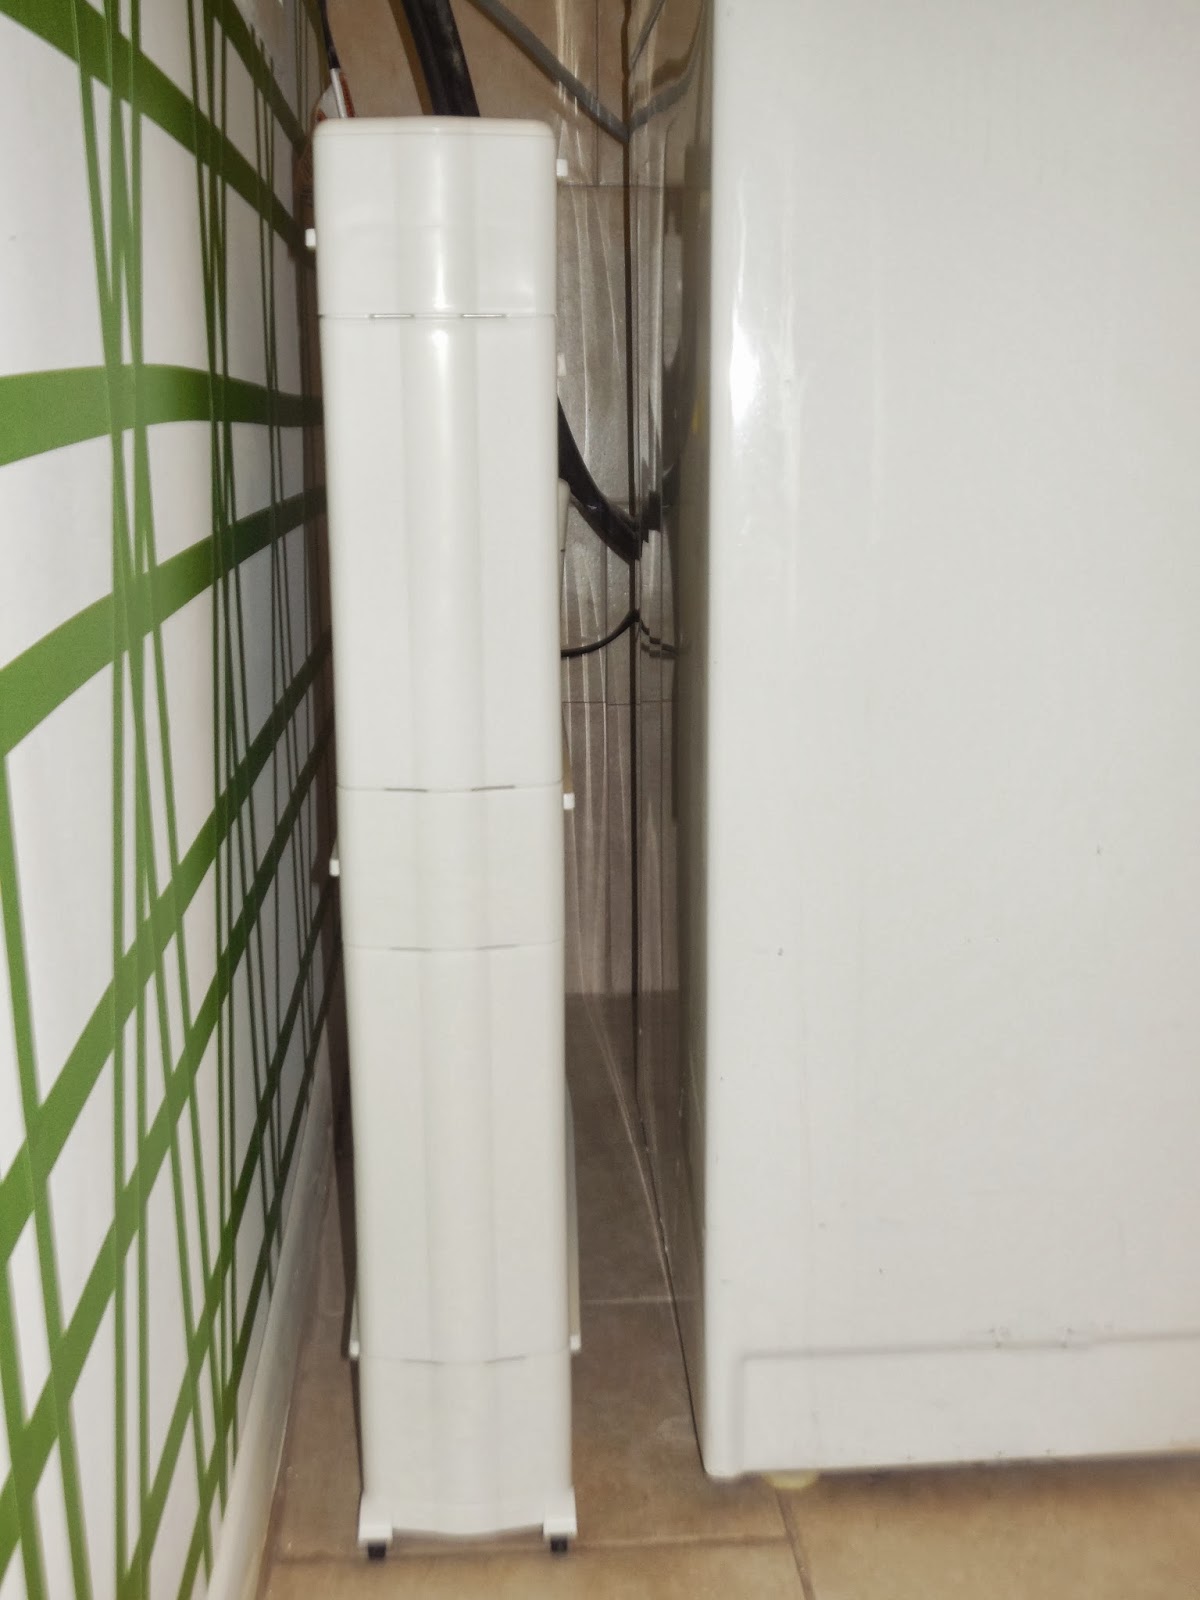
After a lot of looking I found this on Amazon (Sorry, the order hasn't come in yet, so I have to show  a stock picture.)


I like the idea that I can slide this storage caddy in-between my washer and dryer, so everything is hidden and out of the way, but also easy to get at when needed.
 
I also threw this into my shopping cart.
 

                                                                                  Via 
 
It was just what we needed, since currently the ironing board is just leaning against the wall, and we are always hunting for the spray starch.
 
I am planning on making my ironing board a new cover with this fabric, and will have a tutorial up soon.


I also got some white plastic bins from Target. I am going to add a little color with decorative tape, and use them to corral a few more odds and ends in the laundry room.
 
Last, but not least, I also went to Home Goods and picked up these...


I have big plans for this little box.
 
Whew, it was a busy shopping week for me. But, so worth it once everything is done...which is very soon!


Be sure to check out the other linking participants by clicking here.
 
And stop by on Thursday, Nov. 7 for the big laundry room revel and the last day of the One Room Challenge.


Thursday, October 17, 2013

One Room Challenge with Calling It Home: Week Three

 
Today, I was going to talk about what I am putting on the walls of the laundry room...wallpaper, stencil, something else... But I am still struggling with what to do, so for this week, at least, I am moving on to....

Window curtains and fabric

I want to make short curtains to hang on the window above the washer and dryer.


I was inspired by the fabric on this couch designed by Dorothy Draper.

 
Being the state flower of West Virginia, the Rhododendron can be found in the decor of Dorothy Draper's revamp of the Greenbrier Resort in White Sulphur Springs, WV. From wallpaper, curtains and rugs to the plates and dishes, the flower made it's way on to many things. You can even now buy PJ's with the Draper Rhododendron print.


I have always loved this flower especially the pink version, although I have also seen it bloom in white, purple, red, orange, and yellow. When I went on the traditional three day backpacking trips with my childhood summer camp, we would often hike through mountains covered with these beautiful flowering bushes.


So with my inspiration in mind,  I was off to hunt for rhododendron patterned fabric to make the curtains. Here are a few of my finds...


Of course, here I ran into a problem. While I found some beautiful fabric patterns, I felt like Goldilocks who couldn't find one that was "just right". The fabric was either outside my budget, not the right colors, or only available to the trade. I even looked on Etsy and Ebay, but no luck. I know I was being a little bit of a perfectionist here!

Then I remembered Linda's post about Spoonflower.com. I watched a few of their You Tube videos to get a feel for how to create my own fabric. (I must admit I never really thought about repeats in a fabric pattern...now I know.) While the website did suggest some programs to make the design, I stuck to what I know and used Paint and then saved the image as a picture file to my computer. Once I got a feel for doing it, creating my pattern for the fabric was easy. I was able to make it exactly what I wanted. I felt so cool when I was done...I have now created fabric!

There is the option to order a sample first, but I am on this tight ORC deadline see, so I just went all it and ordered the yardage I needed.

It will arrive in about a week and a half. I will be on pins and needles waiting until it gets here! I think curtains made from this fabric will be such an improvement to the laundry room.

Be sure to check out all the other One Room Challenge linking participants by clicking here.

Thursday, October 10, 2013

One Room Challenge with Calling It Home: Week Two

Join In
 
It's that time again for a link up with the One Room Challenge hosted by Linda on Calling It Home.

Last week, I talked about my inspiration for the laundry room. Check that out here.

This week, I am starting at the bottom, i.e. the floor.

We had a very bad rain storm this past spring, which lead to a very bad flood, which lead to our whole town being declared a disaster area. We actually faired better than most, since we only got enough water in the basement of our house to ruin the floors. It then dawned on us that our house, which we had recently purchased, somehow had lasted 80 years without a sump pump. So after getting all the carpet replaced, we then had part of the laundry room ripped up to put in the pump. At this point, we were very tired with spending alot of money to essentially put the basement back exactly as it was/should have been.

Enter the laundry room floor redo...

My husband had installed tile several years ago, so he wanted to do it himself. Plus (see expression of frustration above), we wanted to keep this a low item on the budget.

I saw a tile floor at a friend's house that was a larger size tile and a different-from-standard spacing. I wished I had my camera with me then, but here are inspiration pictures of tile that is similar in shape and pattern.


We were finally able to carve out one weekend a couple weeks to do this project. This left me with zero time to run from store to store to find the "perfect" tile. I ended up at Home Depot, because it was closest, and just had to take what they had in stock. I was disappointed that they didn't have the more rectangular shaped tile, but my husband agreed to lay it in the pattern I wanted, so I will call my tile purchase a draw.

The tile laying began...


As the tile dust began to fly, there were a few comments from my husband of, "I am too old for this (insert non-family friendly word here)." But I think he did a great job getting the tile on the floor.

My son joined in when it was time to grout.


After a lot of work, we now have an intact title floor.


Not exactly like the inspiration picture, but it is good enough. It is definitely an improvement to what we lived with all summer!

Be sure to check back next week when I move up to the walls of the laundry room.

And check out my other fellow One Room Challenge linking participants here.

Thursday, October 3, 2013

One Room Challenge with Calling it Home: Week One

 
For the next several weeks, I am a participating in the One Room Challenged hosted by Linda on her great blog Calling It Home. Be sure to stop by each Thursday to see how my room progresses.
 
We moved into are smallish (great charm, great location) 1920's house almost 2 years ago. In the rush to get everyone settled in, I just put things into rooms where they would fit. Now that we have lived in the house for awhile, and I have a better feel for how we are using the space, I am slowly organizing and decorating one room at a time. For this One Room Challenge, I wanted to work on the room that currently bothers me the most. I figure this would keep me accountable, and I would get the job done without letting that little thing called life get in the way.
 
I chose the Laundry Room.
 
I HATE doing laundry. And yes, if you really think about it, washing clothes in this modern day and age is not really that hard. But it is just so tedious to me, and there are so many other things I would rather be doing. I decided if I had a pretty room. It might inspire me to not dread it so much.
 
I also wanted a really bold space. Our laundry room is in our basement, so for the most part only the family I see it. I thought this would be the perfect spot to step out of my normal decorating style and really have fun with it. Plus, I live in a boy filled world...2 sons and a husband...even the dog is a boy. I needed at least one room in the house to have a touch of pink!
 
So it was off to find inspiration....
 
Growing up, we would visit the Greenbrier Resort, and I was inspired there by the decorating style of Dorothy Draper (I talk more about her here.) I decided the laundry room would greatly benefit from her bold style.


Here is another room by her protégé Carleton Varney. I love the pattern and color combination in this room.


These stripes are the best! This room was designed by Mary McDonald. I always admire her use of color in any room she decorates.


I am in love with this trellis wallpaper. I have to have it for my room.


Are you seeing a theme yet?
 
So I put together an inspiration board of my ideas for what the room will look like.
 
And I wrote out a list to plan my room redo...
 
-Tile floor
-Decorate walls (wallpaper or stencil?)
-Get great fabric to make curtains.
-Organize cleaning supplies.
-Add decoration.
 
Here is the before. The room can only go up from here!
 
 
Be sure to click here to check out the other linking participants.