Have you checked out the wonderful blog Copy Cat Chic yet? Reichel does a great job finding stylish things for the home, that look very similar to high end items, but for a much less price. Today, she is featuring one of my recent low cost finds.
Take a look at the post here.
Recently, I am on the hunt for light fixtures. The current lighting in our dining room is just not my taste. I want to replace it with something that looks good, but also, be a good price.
Check back tomorrow for an update of what I finally found.

Wednesday, August 28, 2013
Tuesday, August 27, 2013
Add More Organization and Pizzazz
I recently painted two dressers for my bedroom, and I put them on either side of my bed so they double as nightstands. Find all of the how-to on a previous post here.

After using the dresser for a few days, I decided my clothes were still a bit jumbled and could be better divided. I went to Target and found this for $1.
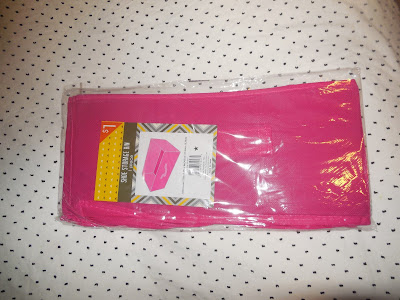
They are actually shoe storage bins.

I put three across in the drawer of my dresser...

...and placed similar items in each one, such as socks in one bin, and nightgowns in another.

The pink color of the bins is fun and unexpected, and makes me smile every time I open my drawer. I can now quickly find the clothes I want when I get ready in the morning. The extra storage is such an improvement to the bedroom.
Check out the link up at Calling it Home , I Heart Organizing , Tatertots and Jello, Pursuit of Functional Home, Remodelaholic

After using the dresser for a few days, I decided my clothes were still a bit jumbled and could be better divided. I went to Target and found this for $1.

They are actually shoe storage bins.

I put three across in the drawer of my dresser...
...and placed similar items in each one, such as socks in one bin, and nightgowns in another.

The pink color of the bins is fun and unexpected, and makes me smile every time I open my drawer. I can now quickly find the clothes I want when I get ready in the morning. The extra storage is such an improvement to the bedroom.
Check out the link up at Calling it Home , I Heart Organizing , Tatertots and Jello, Pursuit of Functional Home, Remodelaholic
Monday, August 26, 2013
Share a Project: Pretty Organized
Today, I am very excited to be a featured reader on the great blog Pretty Organized. Check out it out here.


Also, check out the link up on I Heart Organizing ,Tatertots and Jello, Not Just a Housewife, Remodelaholic
We recently moved into a new house.
It has 1920's charm and a great location, but it is lacking in extra space. To
make this house work, I need to keep it organized.
The first project I had to tackle
was the storage in our bathroom. In the mad dash to unpack, at first, I just
shoved everything that belonged in the bathroom into the cabinet under the
sink. As a result, I had to spend time everyday trying to find what I
needed. (I tried to take a good before picture, but things kept falling out.)

The first step was going through
everything in the cabinet and throwing out what I didn't need. This was not
easy for me, but I made myself toss whatever I had not touched in 6 months. It
was surprising how much stuff fell into this category.
Then it was time to organize what
was left. I decided because I didn't have much width in the cabinet under the
sink, I needed to take advantage of the vertical space available. It was off to
shop. I looked and looked for shelving that would fit in the space inside the
cabinet, but I couldn’t find anything that was just right…I felt a little like
Goldilocks. Then, it dawned on me that I could repurpose a shower caddie.

They were just the right size to fit
in the cabinet. After purchasing two of them, I put them on either side of the
cabinet. I now had a total of 4 shelves to arrange all the bottles and other
small items I needed to store in the bathroom…one side for my things and the
other for my husband’s items.

I still needed to fit larger items
like a hairdryer, but those pesky pipes still posed a problem. I was able to
fit a basket in the open space, and fill it with the larger items.

I love how well the project turned
out. Now I can easily and quickly find everything I need. It was a great
improvement to my bathroom.
Also, check out the link up on I Heart Organizing ,Tatertots and Jello, Not Just a Housewife, Remodelaholic
Wednesday, August 21, 2013
Revel the After Photos: Bookshelves
In yesterday's post, I talked about the large amount of books I had and my need for organized bookshelves.
I do not have a before picture to show you, but let's just say it looked something like this...


These bookshelves have been around through four moves and three paint jobs. I couple of the shelves have footprints in the paint from where my then toddler son ran across them while they were drying on the floor during one of the repaints. Needless to say these bookshelves and I have been through a lot together, and I love that now the shelves are cleared and organized. It really shows my books off to their best advantages. I also now have the room to add a few extra decorative items to the shelves.
First thing I did was pare down the books to only the ones I truly could not part with. This was so hard to do! It was a bit like having to say good bye to old, dear friends. I kept stopping to read them.
I looked something like this....


Check out the link up at Serenity Now, Calling It Home, I Heart Organizing, Tatertots and Jello, Not Just a Housewife, The Pink Pagoda, Remodelaholic, A Bowl Full of Lemons
I do not have a before picture to show you, but let's just say it looked something like this...

And here is the after...
These bookshelves have been around through four moves and three paint jobs. I couple of the shelves have footprints in the paint from where my then toddler son ran across them while they were drying on the floor during one of the repaints. Needless to say these bookshelves and I have been through a lot together, and I love that now the shelves are cleared and organized. It really shows my books off to their best advantages. I also now have the room to add a few extra decorative items to the shelves.
First thing I did was pare down the books to only the ones I truly could not part with. This was so hard to do! It was a bit like having to say good bye to old, dear friends. I kept stopping to read them.
I looked something like this....
The Bookworm by Carl Spitzweg
Finally, I had two boxes full of books, and I carted them off to donate to the local Friends of the Library Book Sale.
I decided to organize the books roughly by subject. This has really helped me be able to quickly find what I am looking for.


I placed some of the books at different angles to add interest to the shelves.

My mother gave me this pillow, and it is one of my favorite things. The glass vase was hand blown at a glass factory near my hometown.

The organized bookshelves were such an improvement to my living room, that I went to work on the bookshelf in my children's room.

We mainly group the books here by subject, author or reading level.

Now that our bookshelves look so great, I declared a ban in our house...no more buying books. We almost exclusively get all of our books from the public library now. I would love to see the data of which family checks out the most books at our library. I think we would win.
Check out the link up at Serenity Now, Calling It Home, I Heart Organizing, Tatertots and Jello, Not Just a Housewife, The Pink Pagoda, Remodelaholic, A Bowl Full of Lemons
Tuesday, August 20, 2013
Find Ideas to Organize Books
I love books. If I have a spare moment, I am most likely to use it to pop into a bookstore and check out what is on the shelves. I almost always leave with at least one book in hand, more if I find some gems in the bargain bins. But I can now officially say I have way too many books on my bookshelves. When I look at them, I feel a little overwhelmed. It was time to organize.
I wasn't sure exactly how I wanted the shelves to look, so I searched around for some inspiration...


I wasn't sure exactly how I wanted the shelves to look, so I searched around for some inspiration...


Check back tomorrow to see how I improved the look of my bookshelves....
Monday, August 19, 2013
Read for Improvement: Part 1
This is the first in a series about books that discuss making changes to improve one's life.
First up is The Happiness Project.

This book, written by Gretchen Rubin, details a year in her life where she works on increasing her happiness. She is already pretty happy, but just needs slight improvements. I like that this project is done within the context of her current life. With my busy schedule, I often don't always have time for anything extra. Jetting off to some meditation retreat for a week of contemplation is just not going to fit into any plans. All of her suggestions can be done within the current state of my own situation.
There was also great information, that the author included, about others in history who have also set out on the quest for happiness. Sometimes it is nice to hear what people thought about or how they approached something they were faced with.
After reading the book, I was inspired to try my own project. I made up my list of what to work on based on the author's resolutions. And just like the book was set up, I will work on a few goals at a time, adding new ones every four weeks. I plan on doing short updates once a month as I make these small steps to improve my life. Stay turned for future posts.
First up is The Happiness Project.
This book, written by Gretchen Rubin, details a year in her life where she works on increasing her happiness. She is already pretty happy, but just needs slight improvements. I like that this project is done within the context of her current life. With my busy schedule, I often don't always have time for anything extra. Jetting off to some meditation retreat for a week of contemplation is just not going to fit into any plans. All of her suggestions can be done within the current state of my own situation.
There was also great information, that the author included, about others in history who have also set out on the quest for happiness. Sometimes it is nice to hear what people thought about or how they approached something they were faced with.
After reading the book, I was inspired to try my own project. I made up my list of what to work on based on the author's resolutions. And just like the book was set up, I will work on a few goals at a time, adding new ones every four weeks. I plan on doing short updates once a month as I make these small steps to improve my life. Stay turned for future posts.
Friday, August 16, 2013
List of Ideas From the Web
School is starting soon, so we are starting out early Saturday morning to shop for supplies. Enjoy your weekend.


Here is a list of ideas for improvements from around the web....
You could get very creative with this.
Learn how to understand yourself a little better here.
This tells you all you ever needed to know.
A fun way to end the summer.
Thursday, August 15, 2013
Read a Good Book: Twitterature Link Up

Today I am participating in a link up with the blog Modern Mrs. Darcy. In this link up, called Twitterature, bloggers are asked to create short, Twitter-style reviews of their recent reads.
There are times when something I read in a book...from the way a character handled a situation to a line that really spoke to me...that did have an effect on the way I responded to or thought about an event in my life. That is why I am such a sucker for these books I recently read. In all of them a book has a big effect on the main character, changing the course of the character's life.
The Shadow of the Wind by Carlos Ruiz Zafon

I was at my bookclub when this book was mentioned, and five of the women there swooned over how good it was. Of course I had to read it. It is about a boy who is taken to the Cemetery of Forgotten Books and allowed to choose one book. The story continues, as the child grows into adulthood, as he searches for the author of the book and finds mystery, romance, and many haunting elements along the way.
The Book Thief by Markus Zusak

This book is about a Germany girl during WWII. She can't resist stealing books. The story is interestingly narrated by death, and it contains a few books with in the book. It was a memorable story leaving me teary eyed at the end.
The Guernsey Literary and Potato Peel Pie Society by Mary Ann Shaffer and Annie Barrows

The main character's journey begins when she gets a letter from a man who got her name out of a book. This starts a letter exchange between her and a small group of people who live on an island. I listened to this as an audiobook and loved all the different characters.
Wednesday, August 14, 2013
Paint Garage-Sell-Find Lamps
When I was a kid I always liked to do the puzzles on the Sunday comics page of my local newspaper. My favorite was the one that compared two pictures, and you had to pick out the differences. So here is that same kind of puzzle. Can you tell the difference between the two pictures? Keep reading for the answer.

I promised in yesterday's post, about painting the green dressers, that I would give more information about the lamps. A few weeks ago, I just happened to drive by a garage sell in my neighborhood, and I saw two lamps sitting at the end of the driveway.

I bought them for a great price, and then immediately took the lamp shades to a local donation/thrift store. They were not my taste at all, and they were HUGE. I wish now I had taken a picture, but they were this big...

The actual lamps had an interesting shape, and I liked the Greek Key design. The brass finish though was very worn, and needed to be painted over. Following this tutorial, I used this spray paint...

And yes, it was primer. The paint finish on the dressers, that the lamps were going to sit on, was so shiny that I actually wanted a more matte finish on the lamps. The primer delivered that, although it did take two coats of paint and a few touch ups.

I am now a convert to spray paint! It was so fast and easy. Why did I ever use a brush before?
Now did you spot the difference in the two pictures? When I put the first lamp I finished on the dresser, I realized why the original lamp shades were so large. The top part of the lamp was very long and threw off the proportions of a normal-size lampshade.
My husband offered to try to fix it. At first, there was some excited talk from him that he might have to use a sledgehammer. I think he was disappointed when he just had to disconnect the wire off of the top that holds the light bulb, and pull off the long narrow piece of the lamp.

I was very impressed with how it looked when he finished. This was such a small change, but it was a great improvement to the lamps.

Check out the Link up at Kammy's Korner.

and Savvy Southern Syle, Thrifty Décor Chick, and East Coast Creative

I promised in yesterday's post, about painting the green dressers, that I would give more information about the lamps. A few weeks ago, I just happened to drive by a garage sell in my neighborhood, and I saw two lamps sitting at the end of the driveway.

I bought them for a great price, and then immediately took the lamp shades to a local donation/thrift store. They were not my taste at all, and they were HUGE. I wish now I had taken a picture, but they were this big...

The actual lamps had an interesting shape, and I liked the Greek Key design. The brass finish though was very worn, and needed to be painted over. Following this tutorial, I used this spray paint...

And yes, it was primer. The paint finish on the dressers, that the lamps were going to sit on, was so shiny that I actually wanted a more matte finish on the lamps. The primer delivered that, although it did take two coats of paint and a few touch ups.

I am now a convert to spray paint! It was so fast and easy. Why did I ever use a brush before?
Now did you spot the difference in the two pictures? When I put the first lamp I finished on the dresser, I realized why the original lamp shades were so large. The top part of the lamp was very long and threw off the proportions of a normal-size lampshade.
My husband offered to try to fix it. At first, there was some excited talk from him that he might have to use a sledgehammer. I think he was disappointed when he just had to disconnect the wire off of the top that holds the light bulb, and pull off the long narrow piece of the lamp.

I was very impressed with how it looked when he finished. This was such a small change, but it was a great improvement to the lamps.

Check out the Link up at Kammy's Korner.
and Savvy Southern Syle, Thrifty Décor Chick, and East Coast Creative
Sunday, August 11, 2013
Make More Storage in my Bedroom: Dressers as Nightstands
I finally finished a project that I worked on for a couple months now. Actually, I worked on it for a weekend two months ago, then life happened, it sat in my garage for awhile gathering cobwebs, and then I dedicated to dedicate all of this Saturday to getting it done. I am so glad that I carved out the time, because I think it looks great!
This was my inspiration photo. It was in Lonny magazine several months ago. As soon as I saw this picture, I knew it was just the pop of color I needed for my bedroom.

At first I thought I would paint the dresser we already had, but that furniture wasn't really working for us in our bedroom anyway. Our master bedroom is on the small side, and a bit of an odd shape...more long and narrow. When we moved into our house, we weren't able to fit our second large dresser. As a result, most of our clothes were in a small chest of dresser. I felt like I was constantly shoving things back in just to get the drawers to close. I needed more storage.
Then I saw this picture on another blog, Little Green Notebook, and got an idea. We had a small nightstand beside our bed. I realized if we upsized it to an actual dresser it would be a much better use of the space, provide needed storage, and I would still have a place beside my bed to put my book at night.


I did a lot of measuring and a lot of looking. Most of the dressers I found and liked were too big for the small space I was working with. Finally, the Tarva dresser from Ikea was the perfect fit.
I painted it Par Three from Ace Hardware.

I found the drawer pulls on Ebay for about a third of the price of what I was looking at elsewhere. The person I bought them from also has an Etsy store called Lakeway Candles. They were very helpful and responsive to my order.
So here is the finished dresser.


I moved about half my clothes into the dresser, and it is working out great. There is a matching dresser on the other side of the bed for my husband's things. The extra storage is such an improvement to the bedroom.
I will tell you all more about the lamps in tomorrow's post.....
Also, check out this link up at the blog Serenity Now, Shabby Nest, Tatertots and Jello, and
Not Just a Housewife, and Remodelaholic
This was my inspiration photo. It was in Lonny magazine several months ago. As soon as I saw this picture, I knew it was just the pop of color I needed for my bedroom.

At first I thought I would paint the dresser we already had, but that furniture wasn't really working for us in our bedroom anyway. Our master bedroom is on the small side, and a bit of an odd shape...more long and narrow. When we moved into our house, we weren't able to fit our second large dresser. As a result, most of our clothes were in a small chest of dresser. I felt like I was constantly shoving things back in just to get the drawers to close. I needed more storage.
Then I saw this picture on another blog, Little Green Notebook, and got an idea. We had a small nightstand beside our bed. I realized if we upsized it to an actual dresser it would be a much better use of the space, provide needed storage, and I would still have a place beside my bed to put my book at night.

Here are a few more inspiration pictures, from other sources, of dressers used as nightstands:


I did a lot of measuring and a lot of looking. Most of the dressers I found and liked were too big for the small space I was working with. Finally, the Tarva dresser from Ikea was the perfect fit.
I painted it Par Three from Ace Hardware.

I found the drawer pulls on Ebay for about a third of the price of what I was looking at elsewhere. The person I bought them from also has an Etsy store called Lakeway Candles. They were very helpful and responsive to my order.
So here is the finished dresser.


I moved about half my clothes into the dresser, and it is working out great. There is a matching dresser on the other side of the bed for my husband's things. The extra storage is such an improvement to the bedroom.
I will tell you all more about the lamps in tomorrow's post.....
Also, check out this link up at the blog Serenity Now, Shabby Nest, Tatertots and Jello, and
Not Just a Housewife, and Remodelaholic
Subscribe to:
Posts (Atom)