Showing posts with label inspiration. Show all posts

Thursday, May 1, 2014

One Room Challenge - Spring 2014: Week Five

Now that we are one week away from the end of the One Room Challenge , I am reflecting on what is actually going to get done in my mudroom.

Some of the things I originally planned, I am finding are not really needed in the room.

Several weeks ago, I was inspired by this colorful triangle filled accent walls


I thought I would use a similar pattern to decorate the doors of my storage cabinets that I put together in Week Two.
 
Since paint and I have not been getting along so well lately, I tried it out first with colored paper that I temporarily taped to the door fronts. I used a few different sized triangles and different colored patterns, but it just didn't look right. Frankly, it made the space too "busy" feeling. I decided to scrap the idea. I will just add in color with other accessories.
 
 
I also planned on making these cute maps. We have lived in a few different states now, and I thought it would be fun to display in the mud room the locations of all our previous homes.


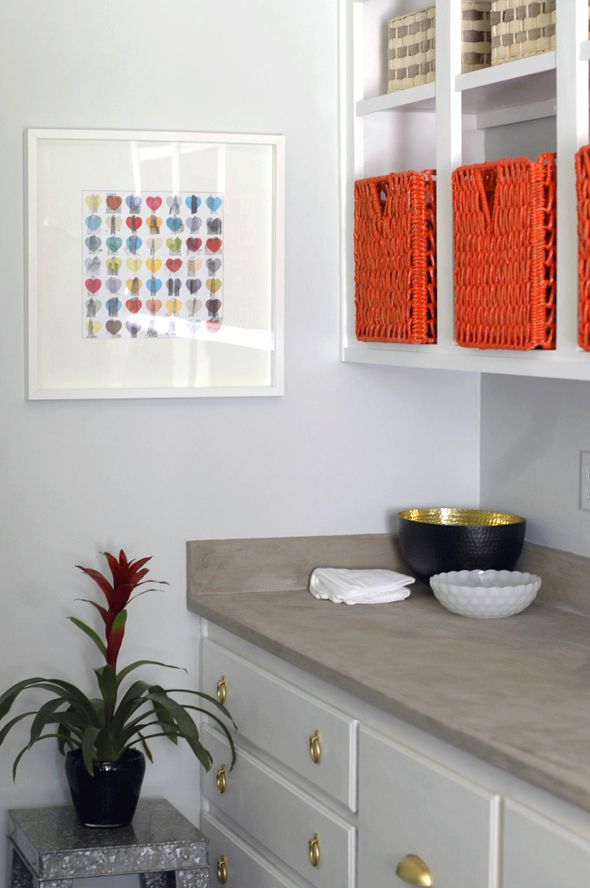
And how great would they look hung with pant hangers like this art work.
 
 
Oh Joy / Whimsy Pop Office
 
But once again, it just would not fit in the room. Too many windows and not enough wall space to make a cluster of art not look too cramped. I will make these maps for another place in our house though. They are just too cute to completely pass up.

 
It seems like somehow this post became about what I am NOT going to do in my mudroom for the ORC. But that is something that I find happens often in decorating. It sometimes comes down to editing, and keeping just what looks "right" for the room.
 
Do you ever have big plans that end up not "fitting" with a room in the end?
 
Can't wait to reveal the finished mudroom next week. Be sure to stop back soon!
 
And check out my other fellow linking participants for the One Room Challenge.

Also linking up with Remodelholic


Thursday, April 24, 2014

One Room Challenge - Spring 2014: Week Four

With Spring Break and the holidays this past week, I feel a little behind with my mud room. I had such ideas and plans when I was putting together my ORC Pinterest Board. But I am halfway through now, and I realize I need to get cracking if I want to get all the details of the room in place before the end of the One Room Challenge.

I have gotten the big things done, such as finding the direction the room will go in Week One.  Also, I added storage shelves in Week Two. Making pretty box to help further organize the space were done in Week Three

Now it is time to think about accessorizing. First thing I need to do is make a decision on the rug. I know I want the color to be yellow. Plus it has to stand up to heavy traffic.

Here are the ones I am considering:

 
Rugs USA Tuscan Moroccan Trellis Flatwoven Yellow Rug


Oh decisions, decisions...Which do you all like best?
 
 
Be sure to head on over to Calling It Home today to check out the other linking participants. And I will be back tomorrow with my favorite pics to pin from those participating in the ORC.

Friday, April 11, 2014

Pin Picks X

I hope everyone had a chance to stop by Calling It Home and check out week two of the One Room Challenge.

Here are a few of my favorites for this week. I included them on the One Room Challenge Linking Party Pinterest Board.


Friday, April 4, 2014

Pin Picks IX

Did you check out Calling It Home yesterday.? All of the link up participants showed off the ideas for their rooms. I can't wait to see what everyone does over the next 6 weeks! Each Friday, I will feature a few rooms as part of my Pin Picks Series.  Today, though, I am spending time with  the family because it is my kid's Spring Break. So in the interest of time, I am sharing the link to the One Room Challenge Linking Party Pinterest Board. Be sure to check out all the talent from both this and past ORC's. I will be back to my regularly scheduled program on Monday.

Wednesday, April 2, 2014

One Room Challenge - Spring 2014 : Week One

It's One Room Challenge Time!
Last Fall I participate by redoing my Laundry Room with a nod to Dorothy Draper and the Greenbrier.
This year I will be using this picture as my inspiration image.
But I am not redoing a living room. It's the color scheme from this picture  that really drew me in. The use of primary colors is done in such a way that it doesn't look like a crayon box, but much more sophisticated. That is what I hope to replicate for this One Room Challenge when I redo my....

Thursday, March 27, 2014

Fiqure Out How to Use Polyvore

Have you checked out Polyvore yet? It is a site where you can create rooms with out actually lifting any heavy furniture, put together an outfit without trying anything on, or try out the latest beauty must haves without using makeup remover between applications. It is pretty much mood board heaven. And then once you plan everything out, there is information about how much each item costs and where to purchase it. So the ideas can move from the computer screen to real things in your home.

I had so much fun trying it out last week for the first time!

Here is my fantasy Kate Spade Easter Outfit.

Kate Spade Easter Outfit


There are also contests with great prizes for the winners. To enter simple create your set around the given theme. It definitely made me step out of my box and got my creativity flowing. And since it was so easy to do (see comment above about no heavy lifting) I could lean towards  being a bit more over-the-top when designing the room.

Here are two rooms I created for The Pink Pagoda's Art Filled and Feminine Contest.

Art Filled Feminine Office at Improvement List

Link to Polyvore for Source List

"Art Filled and Feminine at Improvement List" by improvementlist on Polyvore
Link to Polyvore for Source List


So are you ready to create your own sets? Here is a quick tutorial just to get you started.
 
 
1. Go to Polyvore
 
2. Create an account.
 
3. At the top of the screen, click the word Create, and from the drop down menu select Set.
 
4. On the right side of the screen you can type in keywords to find the item you want to add.
 
5. Once you find what you are looking for, drag the item on to the Collage.
 
6. It you want to change the size, simply click on the edge of the image and move it to adjust.
 
7. Repeat steps 4-6 until the set looks just right.
 
8. Click Publish in the upper left hand corner. You are done!
 
Once you get the basics down you can move on to cloning, flipping and further adjusting the placement of the image. Also, you can remove the background or  custom crop it. There are templates and other effects that can be added.
 
There is  a tool called the Clipper which sounds great. Apparently, if you find a picture of an item elsewhere, you can use this tool to add it to your account to use in your sets. I just can't seem to get it to work for me so far. (I am sure it is error on my part!) Let me know if you have tried it out.
 
If you are a newbie like me and join Polyvore, or you are an old hat who has been creating sets for years, be sure to follow me  on Polyvore by clicking here. I will follow back. I can't wait to see what everyone puts together.
 
So what to do you think about Polyvore?


Monday, March 3, 2014

Paint a Porch Ceiling Blue

 
Many years ago my husband and I spent a vacation in the Florida Keys.  While walking around the town of Key West, I was enamored with the white front porches with ceilings painted pale blue.


We asked one of the locals about the  trend, and were told it was to keep away haints (another term for restless ghosts.) Apparently, this color was suppose to protect the occupants of the house from evil sprits entering the home. We laughed thinking that this was a story made up to scare tourist. Later, we found out that this was a tradition through other parts of the south, and people even refer to this soft  blue green shade as Haint Blue.


I did a little research  and discovered that there was also a practical side to this blue. Apparently, since it is almost the same shade as the sky, insects and spiders are fooled by it and do not build their nest or webs in the top of the porch. That would be one way to repel the bugs while sitting on the porch swing sipping your sweet tea on a hot summer day.

Would you like to paint your porch ceiling blue?

 
blue porch ceiling


Today I am participating in the Blue and White Bash hosted by The Pink Pagoda. Be sure to head on over there to see more color inspiration.

Friday, February 21, 2014

Pin Picks VII

Sometimes you need new counter tops, but ripping everything out and replacing them with granite is just not going to happen anytime soon. A little refreshing might be all that is needed for now.

I had to share these recent pins I came across on Pinterest. All are different ways to DIY countertops on a budget. They would be a great improvement to any surface that needs a little pick-me-up.


If the counter tops aren't looking good anymore, just cover them up. Adding faux marble contact paper can make them look amazing.


fauxmarblecounter


Or put on an over lay of concrete. After these are buffed, the countertops will shine.
 
 photo fDSC_0476copy.jpg


Paint is always an option to fake the look of more expensive counters. You can either make up your own pattern or buy a kit specially designed for this project. It is super affordable and easy to do. It is amazing how much these look like granite.


And it doesn't end with just a stone look. Using chalkboard paint opens up all kinds of possibilities.
Annie Sloan chalk paint counter top Q could be a good way to makeover the kitchen counters until we can do a major remodel?


Of course there are always counter tops that just can't be saved. Replacing them with wood would lighten up a kitchen and give it great style.
 
DIY wood countertops


Were you inspired by these five ways to spruce up a counter top? Which would you like to try in your home?
 
 
For more inspiration be sure to check out my Pinterest boards. And be sure to follow all. I find so many other great boards to check out that way.


Linking up with Carolina Charm
 

Thursday, February 20, 2014

Find an Idea for a Unique Kitchen Backsplash

 
I loved the kitchen featured in the March edition of House Beautiful. Those shutters are such a great pop of blue, and the island works well for the small space. But what really caught my eye was the back splash behind the sink and cook top.
 
 
lee jofa lauretta fabric backsplash
 
 
At first I thought it was some kind of hand painted tile. But after I read the article, I realized it was fabric laminated between two piece of glass. Fabric as a backsplash! What a great way to incorporate more color and pattern into the space. This idea would be an improvement to any kitchen.  Imagine the possibilities!
 
 
So what do you all think? Would you try this in your house?


Tuesday, January 28, 2014

Find Inspiration: Adding a Pop of Color to the Back of Bookshelves


I love the white bookcase I have in my living room. But lately I've been think that it would be nice to add a little pop of color to the back of the shelves.


I could always just paint it. That would be quick, easy and cheap. And it would be a great way to add an accent color to the room.


Bookcase
 
Via
 
50 shades of Grey implemented on Home office furniture Ideas :)
Use the extra blue paint for the back of bookshelves.
 
A wall of bookshelves accented with yellow paint on the interior back walls. Sitting in front is a stellar cream sofa with a green pattern.


But I would like to add something a little more than just color. Maybe, a pattern with wallpaper would be just the right addition to the room.
Bookshelves with wallpapered back - Pasadena 1 Home by Vanessa De Vargas of Turquoise Interior Design 
 
 Wow with Wallpaper
  Via


A great way to introduce a little texture is by using bead board. The kind made out of wallpaper could easily be cut to fit into the back of the shelves.

 
 Built In Shelving
beadboard backed shelves
This may be the perfect solution to that black screen and the empty nook in my living room.  AStoriedStyle.com


Or I could use more unusual materials like tin or wood planks from an old fence.
Paint a bookshelf, take the back off, and place metal tiles on the back. Could do version of this to china cabinet


And what a great idea to make each shelf different. That would definitely add interest to the room.
I really love this. It would make me happy to walk into this room everyday. How could you stay in a bad mood when you're surrounded by this kind of colour?
 
Put Cubby Holes to Use


So many possibilities... I will let you know once I finally pick which way to go. What is your favorite?


Link Up with Remodelaholic